11 Temmuz 2012 Çarşamba
10 Temmuz 2012 Salı
9 Temmuz 2012 Pazartesi
Gluten-Free Multigrain Lemon Poppy Seed Muffins


 |
| Multigrain gluten-free lemon poppy seed muffins. |
I usually don't bake in the summer. I mean. Do you? Who in their right mind likes to crank up the oven when it's hot and steamy outside? At my age darling, I'm sticky enough as it is. Hot flashing and fanning myself with the latest issue of AARP as I bounce and waggle on one of those bubblegum hued balance balls, lurching at my desk like a pear-bottomed yoga reject seeking not enlightenment, I am sorry to tell you, but the promise of burning three hundred extra calories as I sit and write. Apparently using one's sacred core (or is it sacroiliac?) to perch atop a ridiculously big ball with a penchant for rolling sideways requires fuel. More fuel than say, slumping.
Or lying on the sofa reading a book. With the oscillating fan on high.
Which is what I'd rather be doing.
Preferably with a bar of organic dark chocolate.
I would rather keep the kitchen cool. By not cooking (that's why The Goddess- in her infinite wisdom- invented tomato sandwiches).
But a certain husband had a craving.
For a lemon poppy seed muffin. Our son planted this idea in his head last week, during an impromptu visit. Said son was blithely munching on a lovely looking gluten-free lemon poppy seed muffin. Freshly baked. Adapted from one of my muffin recipes.
He mentioned, in passing, it was fabulous.
His secret?
I used a little cornmeal, he told us.
And thus the muffin craving was born.
And who am I to deny my husband.
He buys me dark chocolate after all.
And turns on the fan. So that I don't have to get up from the sofa.
 |
| Lemony gluten-free multigrain poppy seed muffins. |
Gluten-Free Multigrain Lemon Poppy Seed Muffin Recipe
A multigrain blend of gluten-free flours gives these lemony muffins a slightly grainy texture that gives them a certain heft quite suitable for breakfast. These won't be mistaken for cupcakes.
Ingredients:
1/2 cup sorghum flour
1/2 cup brown rice flour
1/2 cup white rice flour
1/2 cup potato starch or tapioca starch
1/4 cup gluten-free corn flour/meal
1/4 cup almond or hazelnut flour
2 tablespoons lemon zest
2 teaspoons baking powder
1 teaspoon xanthan gum
1/2 teaspoon fine sea salt
2/3 cup organic cane sugar
3 tablespoons coconut oil, melted
2 organic free-range eggs, beaten (or Ener-G Egg Replacer, mixed)
1 cup almond or non-dairy milk
1/4 cup fresh lemon juice
1 tablespoon poppy seeds
Instructions:
Preheat oven to 375º. Line a 12-muffin pan with paper liners.
In a bowl whisk together the flours, starch, baking powder, xanthan gum and sea salt. Set aside.
In a separate mixing bowl beat together the sugar, coconut oil and eggs until smooth.
Add in the whisked flour blend. Beat to combine. Add in the almond milk and lemon juice and beat for two minutes until the batter is smooth and slightly sticky. Stir in the poppy seeds by hand and mix thoroughly.
Spoon the batter evenly into the twelve muffin cups.
Bake in the center of the preheated oven for about 25 minutes or so. The tops should be domed and firm to a light touch. If your oven runs a tad cool, bake longer; a tad hot, check the muffins sooner.
Cool the pan on a wire rack for a few minutes until the muffins are cooled enough to handle. Remove from the pan and continue cooling the muffins on a wire rack.
Serve warm with vegan butter or cream cheese. Or better yet, slice and grill in a dab of coconut oil.
Makes one dozen muffins.
Wrap, bag, and freeze the muffins for future tea time treats.
Recipe Source: glutenfreegoddess.blogspot.com
All images & content are copyright protected, all rights reserved. Please do not use our images or content without prior permission. Thank you.

Gluten-Free Whole Grain Olive Bread
 Crusty, fragrant gluten-free olive bread, warm from the oven.
Giving up bread is hard. Bread is basic. Almost a need. Like air. Like breathing. It is both routine and celebratory. Prosaic and divine. A simple, torn-off hunk of good bread embodies a deep sense of nourishment, for body and soul. The bewitching mix of a handful of flour, some yeast, some salt, some water.
Stir. Knead. Rest. Bake.
And as if by magic, this warm and fragrant alchemical creation called bread appears.
And all is right with the world.
When I think of our honeymoon in Italy (seventeen years ago, darling) I think of the color of the evening sky above the cypress. A shot of burnished gold that shimmered with the faintest veil of pink and lemon yellow. I think about the shopkeepers sweeping their doorsteps each morning, nodding their Buon giorno! as we walked to fetch a New York Times and a cappuccino not served in a paper cup. There was love, yes. And wine. And olives.
And there was bread.
The best bread I had ever devoured. My go-to breakfast was a plate sized flat-bread studded with olives, paper thin tomato slices, or chopped fresh garlic. Chewy, salty, sweet, and earthy. A bread worth the walk into town. I must have eaten dozens in our too-short two week stay.
Here in southern California, I have been living almost breadless. By choice. The hundreds of gluten-free breads I have baked in the past nine years have not tempted me into the kitchen. Not even the best gluten-free bread recipes. Starch, you see, is not agreeing with me lately. I think we may be breaking up. For good. My body hums happily without it. My waistline is trimmer without it (though not quite up to honeymoon standards, I am seeing the promise of a waistline appear). But this week I started remembering.
The bread.
In Italy.
And the craving began.
So I began bargaining with myself. The dialogue went something like this.
Okay. You want a piece of bread, darling? You're going to have to bake it without starch. Without sugar. You know that, right? And you are prepared to plunge into abject failure if this gluten-free whole grain concoction doesn't turn out? It is a risk, you know. Baking without gluten. Making bread without starches. It's tricky. It's fickle. So if this turns out badly, promise you won't despair.
I pulled out every non-starchy flour and ingredient from my snug little pantry and imagined my pre-celiac Italian memory. I stood and stared at the tumble of half-used bags and battered boxes on the counter for a good ten minutes. Steve walked by and glanced at his wife of seventeen years standing deer-in-the-headlights still.
He knew not to ask.
I grabbed brown rice flour. Almond meal. Millet flour. Quinoa flakes. Rice bran. Garlic. Sea salt. Olive oil. An impossible, motley crew of ingredients that would prompt any Italian baker to raise her eyebrows in a justified Che cosa succede?
And guess what, my Bella Bambina?
You know what.
Smooches.
 |
| We tore off pieces of bread and dipped it in olive oil. |
Gluten-Free Whole Grain Olive Bread
This rustic gluten-free bread is not unlike focaccia, I am happy to say. The golden crust and tender, shallow profile remind me of the classic Italian flat bread we once devoured in Italy- celebrating our honeymoon. Kalamata olives add a salty punch.
Preheat the oven to 375ºF. Line a 9x12-inch baking pan with a piece of parchment paper, and set aside.
Ingredients:
1 cup sorghum flour
1/2 cup brown rice or GF millet flour
1/2 cup almond flour/meal
1/2 cup quinoa flakes
1/4 cup rice bran
1 teaspoon garlic powder
1 teaspoon sea salt
1 teaspoon xanthan gum
1 packet (2 1/2 teaspoons) active dry yeast
3 organic free-range eggs, beaten
5 tablespoons olive oil
1 tablespoon honey or organic agave nectar
1/2 to 3/4 cup warm water (start with less)
For topping:
1/3 cup pitted, sliced kalamata olives
Dried or fresh thyme
Coarse sea salt
Instructions:
In a large mixing bowl, whisk together the sorghum flour, brown rice or millet flour, almond flour, quinoa flakes, rice bran, garlic powder, sea salt, xanthan gum, and active dry yeast.
Make a well in the center of the dry ingredients and add the beaten eggs, olive oil, and honey. Start beating the eggs, oil and honey into the dry mixture.
Slowly begin adding the warm water and beat as you go, incorporating the wet ingredients. Watch the consistency of the batter, and add only the amount of warm water that you need to achieve a smooth, sticky batter akin to muffin batter. I used up to 3/4 cup liquid, but you may need more, or less, depending upon your situation (humidity and storage affects flours).
Continue to beat for one minute to lighten the batter and create a smooth, creamy dough.
Using a silicone spatula, scoop the bread dough onto the center of the parchment lined baking pan. Using wet or oiled hands, form a low, oval loaf shape, smoothing out the dough as best you can.
Stud the surface with the kalamata olive pieces. Sprinkle with a dusting of thyme and coarse sea salt.
Bake in the center of a pre-heated oven for 25 minutes. Brush the top with a little olive oil and continue baking for another 5 to 10 minutes until the loaf is golden and firm, and a bit crusty. My olive bread baked for a full 35 minutes (at sea level).
Remove the pan from the oven and sprinkle a little more sea salt on top of the loaf, if desired. Allow the bread to cool for a few minutes in the pan; then gently remove it, and set it on a wire rack to continue cooling for a few minutes.
 |
| Tear off a piece of this tender olive bread and start dipping. |
It is tantalizingly delicious warm. Use a good, sharp bread knife to cut it into wedges or thin slices. Dip pieces in olive oil and a rich balsamic vinegar, such as blackberry or fig balsamic vinegar. Heaven.
Cook time: 35 min
Yield: One loaf
 |
| Gluten-free flat bread made from whole grains studded with kalamata olives. |
I confess. We ate this olive bread all day long. First, we ate a few warm slices straight from the oven- just to be sure it was as fabulous as it looked. It did not disappoint. I kept nibbling small pieces as I photographed.
Later, we ate torn off pieces dipped in a blackberry balsamic vinegar that I picked up at the Redondo Beach Farmers' Market, and a dab of extra virgin olive oil. The bread held together beautifully. Like "real" Italian bread. It did not crumble. It did not dissolve into dust. The crumbs you see are from me breaking off tiny pieces to taste as I set up the photography shoot. It's one of the perks of photographing food.
You get to sample the object of your affection.
Karina's Notes:
I am always experimenting with different flours, forever in pursuit of gluten-free breads and goodies that satisfy my taste buds and offer me more than empty, starchy calories. I choose each flour with a purpose in mind- flavor, texture, protein. So to offer substitution suggestions is very often tricky. If you sub one of my higher protein flours with a starch, for instance, your results will not be the same. And if you use an all-purpose g-free flour mix, your results will be inferior- that I say with confidence, after testing many gluten-free flour blends on the market.
Yes, I know that it is easier to reach for a single box of mix.
I agree, in fact.
It is easier.
But is it as marvelous? Is it as tender and fragrant and satisfying?
That is the real question.
Recipe Source: glutenfreegoddess.blogspot.com
All images & content are copyright protected, all rights reserved. Please do not use our images or content without prior permission. Thank you.
Valentine Day ideas:: Day 14

Happy Valentine's Day! I wanted to share one more Valentine idea. Here are 2 fun ideas on how to spruce up a plain white box. You can use one of our favor toppers and flags or feathers. I braided red, white and pink twine to add a little texture and different element to the package.

I hope you all have a fabulous Valentine's Day and I will be back tomorrow with another great party I'm dying to share with you all!
Give Luck- St. Patrick's Day collection

Happy LUCKY Day! Give luck this St Patricks Day! I love how this holiday is center around superstitions and luck.... so throw a party to bring luck into the rest of their year with our printable collection.

An inexpensive and extremely easy backdrop is hanging crepe paper streamers. Mix different greens and yellows to create a fun a playful backdrop. Accent with white platters and serving trays and your desserts and foods will standout and shine!

Make mini cupcake stands by stacking chocolate coins askew and place a mini cupcake on top for a fun, easy and taste pedestal!

We decorated our cupcakes simply. Frost with green frosting and sprinkled mini yellow perils and green shamrocks sprinkles on top.


As we all know the drinks are a major part of St Patricks day so "cheers to luck" this St Patricks Day.

Another item in our collection are sucker toppers. For an unique centerpiece you can place suckers, rock candy suckers and curly ribbon streams in a vase full of candy.

Tent fold favor toppers. You can use these on baggies or I wanted to show you a new way to use favor toppers. Place them around a clear box to give a different favor. Our favor toppers have saying of Lucky, Wish, Shamrock Love and Happy LUCKY Day.

Crusty Rustic Bread (it's no knead!)


Everyone reading this, please, you need to make this bread! I'm telling you, this is the best loaf of yeasted bread I have ever made! I've baked many o' things, but funny thing until today I've never made my own loaf of no knead rustic bread. Seriously, why I have not tried it until now I can never tell you! I had no idea that such an incredibly quick and easy recipe could yield such amazing results. It is the perfect loaf of rustic bread, wonderfully crisp and chewy on the outside, while tender and even slightly moist on the inside. I can now officially say I've made a loaf of bread as good as a professional artisan bread baker thanks to the wonderful post over at Simply So Good. I'm so happy I found this recipe (from my countless hours of Pinterest gawking. Seriously I could spend my whole day on there, it's dangerous). Never again will I pay $5 to buy a loaf of rustic bread at the store or bakery. Astoundingly I liked this even better and it had to cost less than .50 cents to make.
I also can't wait to try many different variations on this simple recipe. Thank you thank you to Simply So Good for posting such an amazing recipe. Head over there for step by step photos, mix in ideas and to browse through the over 1,000 comments posted (when I saw there were over 1,000 comments I knew this recipe had to be good). I hope this recipe becomes a staple in your home too!


Crusty Rustic Bread
Yields 1 loaf
Ingredients:3 cups all-purpose flour1 3/4 tsp salt1/2 tsp active dry yeast1 1/2 cups warm water (about 110 degrees)
Directions:In a large mixing bowl, whisk together flour, salt and yeast. Pour in warm water and stir mixture with a wooden spoon until a shaggy ball forms. Cover bowl with plastic wrap and allow to rise for 12 - 18 hours (on the counter at room temperature).Heat oven to 450 degrees. Once oven has reached 450 degrees, place a cast iron pot covered with lid into preheated oven, heat pot for 30 minutes. Meanwhile, turn dough out onto a heavily floured surface then shape dough into a ball. Cover dough with plastic wrap and allow to rest while pot is heating. Remove pot from oven and with floured hands, carefully drop dough into hot pot (you DON'T need to grease the pot) cover with lid, then immediately return pot to oven and bake 30 minutes (at 450 degrees). After 30 minutes, remove lid from pot and bake uncovered for 15 minutes. Remove from oven and allow bread to cool on a cooling rack. Once completely cooled, bread stores well in an open paper bag (it helps the bread maintain it's crisp crust. I wouldn't recommend storing it in an airtight container or ziploc bag).
Update 7/3/11:
I made a wheat version of this with 1 1/2 cups whole wheat flour, 1 1/2 cups bread flour, 1 1/2 tsp salt, 1/2 tsp yeast, 2 Tbsp honey combine with 1 1/2 cups + 1/3 cup warm water and rise and cook according to directions listed. It was delicious!
Recipe Source: adapted from Simply So Good, thank you for such an incredible post!
8 Temmuz 2012 Pazar
Rolo Stuffed Snickerdoodle Cookie Dough Bites

It's good to be home and back in the kitchen! Vacation to Cali was fun but oh how I missed my kitchen and the cooking and the baking =). Call my crazy but the kitchen is one of my favorite places to be. The possibilities of what you can create are endless. It was fun to try new restaurants while vacationing but there's nothing quite like a delicious home cooked meal prepared exactly as you wish. Anyway onto what's important here - these, melt in your mouth, sweetly spiced, Rolo Stuffed Snickerdoodle Cookie dough bites. Quite the name eh? I mentioned a while back how I've become obsessed with cookie dough, well it was no lie. That love led me to create these. I've seen Rolo Stuffed Snickerdoodle Cookies in the past but why not just make them as cookie dough bites without baking? With these you get less mess, less waiting yet still one indulgent, chewy (thanks to that yummo rolo) cookie dough bite. Simply said, they're Fantastic!Note, if you don't want to indulge as much these bites are also delicious without Rolos stuffed in them. So if you are wanting to make them right away but don't have Rolos on hand I'd say just try them next time with the Rolos. Enjoy!


Rolo Stuffed Snickerdoodle Cookie Dough Bites
Yields about 28
Ingredients:
1 1/2 cups all-purpose flour
1 tsp cinnamon
1/8 tsp nutmeg
1/4 tsp salt
1/2 cup salted butter, softened
2/3 cup packed light brown sugar
1/4 cup granulated sugar
1/4 tsp cream of tartar
3 Tbsp heavy cream
1 1/2 tsp vanilla extract
28 Rolo candies
3 Tbsp granulated sugar
3/4 tsp cinnamon
Directions:
In a mixing bowl, whisk together flour, 1 tsp cinnamon, nutmeg and salt, set aside. In the bowl of an electric mixer, whip together butter, brown sugar, 1/4 cup granulated sugar and cream of tartar until pale and fluffy, about 4 minutes. Stir in heavy cream and vanilla extract. Add dry ingredients and mix until combine. In a separate small mixing bowl, whisk together 3 Tbsp granulated sugar and 3/4 tsp cinnamon. Scoop dough out 1 (even) TBSP at a time, then press one Rolo candie into the center of scooped dough and roll into a ball. Roll each dough ball into cinnamon sugar mixture. Chill or serve immediately. Store Cookie Dough Bites in refrigerator.
Recipe Source: Cooking Classy (adapted slightly from my Chocolate Chip Cookie Dough Bites)
Grilled Chicken with Balsamic Barbecue Sauce
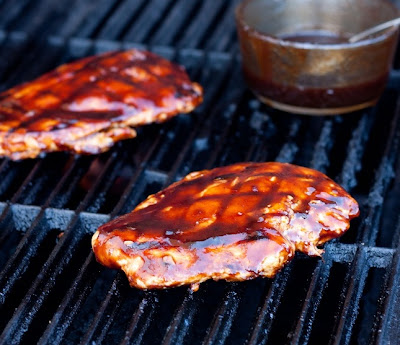
Are you looking for a wowing and simple grilling recipe for the upcoming 4th of July celebrations? Well, I'm quite certain you've found just what you are looking for. This grilled chicken smothered in a homemade Balsamic Barbecue Sauce simply said, is incredible! It is definitely up there with my favorite grilled chicken recipes. You get a tender chicken breast grilled to perfection that's basted with a flavorful, tangy, not overly sweet sauce that will have you coming back for more. I'd say this recipe is one you most definitely are going to want to try. Don't be scared by the long list of ingredients in the sauce, most of them are pantry staples that you likely already have on hand. I hope you enjoy and have a great 4th of July!
Grilled Chicken with Balsamic BBQ Sauce
Yields about 6 servings

Ingredients:
6 medium boneless, skinless chicken breasts halves (thighs would work great too)
Salt and pepper, to taste
Olive Oil for brushing grill
1 Recipe Balsamic Barbecue Sauce, recipe follows
Directions:
Preheat grill to medium high heat. Place chicken in a ziploc bag and somewhat gently pound chicken with the flat side of a meat mallet to an even thickness (you just don't want to destroy the chicken, that's why I say somewhat gently). Season each side of chicken breast with salt and pepper. Brush grill lightly with olive oil. Place chicken on grill and cook (with lid closed) 5 - 8 minutes per side, until internal temperature reaches 160 degrees. Baste chicken generously with Balsamic Barbecue Sauce during the last few minutes of grilling (if you want sauce for dipping reserve some of the sauce in a separate container so you aren't contaminating sauce while basting chicken, or alternately you could heat remaining barbecue sauce over stove top to kill bacteria). Serve warm.
Balsamic Barbecue Sauce
Yields about 1 1/2 cups
Ingredients:
1/2 cup granulated sugar
2 1/2 tsp cornstarch
1/2 cup balsamic vinegar
1/4 cup water
1/4 cup apple juice
1/4 cup tomato paste
1 1/2 Tbsp molasses
1 Tbsp low sodium soy sauce
1 Tbsp Worcestershire
1 tsp liquid smoke, hickory flavor
1/2 tsp onion powder
1/2 tsp garlic powder
1/2 tsp salt, or to taste
1/4 tsp freshly ground black pepper
Directions:
In a medium saucepan, whisk together sugar and cornstarch. Stir in remaining ingredients then heat mixture just to a boil over medium high heat, stirring frequently. Once mixture reaches a boil, reduce heat to low and simmer 15-20 minutes, stirring occasionally, until sauce has thickened and slightly reduced. Remove from heat, allow to cool and store in a non-reactive, airtight container in the refrigerator up to one week.
Recipe Source: Cooking Classy
Two Ingredient Fruit Dip (A 60 Second Recipe)

How can such an incredibly simple recipe be so fantastically good? I absolutely love this fruit dip! I got the recipe from my sister whom got it from her mother in law whom got if from I don't know where. Basically what I'm saying is this recipe is not my creation, so if you know who came up with it please let me know because I would love to credit them. They seriously came up with something genius. This recipe literally can be made, ready for dipping in 60 seconds. It doesn't get much easier than that. It's creamy, fluffy, sweet and oh so delicious. It will have you doing the finger swipe to any remaining streaks straggling behind in the bowl. If there's any left the next day (which is very very rare) I always want to eat it for breakfast, well it is served with fruit after all so that's healthy right =)? Enjoy! Oh and if anyone tries this with honey or blueberry cream cheese please let me know if you like it, I've always wanted to try a different flavor but am too comfortable with the yummy strawberry version to try something new.


Two Ingredient Fruit Dip (A 60 Second Recipe)
Ingredients:
8 oz strawberry cream cheese, at room temperature
7 oz marshmallow creme
Directions:
In a medium mixing bowl, using a fork, whisk together strawberry cream cheese and marshmallow cream until well combine. Serve with fruit for dipping (my favorites are strawberries, apple slices, blueberries or diced pineapple. This is also delicious with mini pretzels). Store in refrigerator up to three days, stir again before serving.
Strawberry Coffee Cake

I tell you no lie when I say this Strawberry Coffee Cake is the best coffee cake I've ever eaten! I love it! It makes sense that I like it so much because I adapted the recipe slightly from my favorite ever blueberry muffins recipe. I had some fresh strawberries in the fridge I needed to use up and I've been wanting to make a coffee cake recipe for some time so I decided why not strawberry? The combination of flavors in this cake is irresistible! You get a melt in your mouth, deliciously flavorful, buttery cake that sandwiches a layer of fresh, sweetened, juicy strawberries then to finish it off it's crowned with a generous amount of an incredible crumb topping (I've said it before, please don't substitute the Turbinado sugar, I think it's a must). Everyone was coming back for more of this heavenly cake. Make it for dessert or a breakfast treat (I mean really what better way to start the day =), either way I have the feeling you're going to love this recipe. Enjoy and share!


Strawberry Coffee Cake
Yields about 12 servings
Ingredients:
Strawberry Filling
8 oz. fresh strawberries, diced (about 1 1/3 cups)
1/4 cup granulated sugar
2 Tbsp cornstarch
1 Tbsp cold water
1 tsp lemon juice
Crumb topping
1/3 cup all-purpose flour
1 1/2 Tbsp granulated sugar
2 1/2 Tbsp butter, chilled and diced into cubes
1 1/2 Tbsp Raw Turbinado Sugar
Cake:
1 3/4 cup all-purpose flour
1 tsp baking powder
1/2 tsp baking soda
1/2 tsp salt
7 Tbsp butter, softened
1 cup granulated sugar
1 large egg
1 tsp vanilla extract
1/3 cup sour cream
1/3 cup buttermilk
Directions:
Preheat oven to 350 degrees.
To prepare strawberry filling: in a medium saucepan whisk together 1/4 cup granulated sugar and cornstarch. Stir in cold water and lemon juice. Add in strawberries. Bring mixture just to a boil over medium heat, stirring constantly. Once mixture reaches a boil, reduce heat to low and simmer about 1 minute, stirring constantly, until thickened. Remove from heat and set aside to cool.
To prepare crumb topping: add 1/3 cup all-purpose flour, 1 1/2 Tbsp granulated sugar and 2 1/2 Tbsp butter to a small food processor. Pulse mixture just a few seconds until combine (it should still be fluffy, if you pulse to long it will become too dense). Pour crumb mixture into a small bowl and whisk in Turbinado Sugar, set aside.
To prepare cake: in a mixing bowl: whisk together 1 3/4 cup flour, baking powder, baking soda and salt, set aside. In the bowl of an electric mixer, whip together 7 Tbsp softened butter and 1 cup granulated sugar until pale and fluffy, about 4 minutes. Stir in egg and vanilla. Mix in sour cream. Add dry ingredients alternating with buttermilk in two separate batches and mix just until combine.
To assemble cake: pour and evenly spread 1/2 of the cake batter into a greased 8x8 baking dish. Spread strawberry mixture evenly over batter layer. Dollop remaining batter by the spoonfuls over strawberry mixture and gently spread batter into an even layer. Sprinkle top evenly with crumb topping. Bake in preheated oven 50-55 minutes until golden and toothpick inserted into center comes out clean. Allow to cool slightly before cutting (if you can =).
Recipe Source: Cooking Classy (adapted slightly from my Blueberry Muffins)
Coconut French Toast with Coconut Syrup

Hello Breakfast! Ordinary French toast gets a major upgrade with a few exciting coconut additions. This fluffy french toast is made with creamy coconut milk and then it gets more real coconut flavor from pure coconut extract. Then it's cooked until perfectly golden and drenched with an irresistible, deliciously sweet coconut syrup (which again is full of real coconut flavor from coconut milk and extract) and to finish it's sprinkled with what more but the real thing, shredded sweetened coconut.
I listed below additional ideas for this french toast which I cannot wait to make in the future. This recipe is definitely going into my breakfast (and dinner) rotation! Enjoy and share!

Coconut French Toast
Yields 10 slices (about 5 servings)
Ingredients:
1/2 cup canned coconut milk, well shaken
1/2 cup milk
5 large eggs
1/2 tsp coconut extract
1/2 tsp vanilla extract
2 Tbsp all-purpose flour
1 Tbsp granulated sugar
1/8 tsp baking powder
1/8 tsp salt
10 1" slices day or two old French Bread
Coconut Syrup, for serving, recipe follows
Sweetened shredded coconut, for serving, optional
Directions:
Preheat a non-stick electric griddle to 350 degrees. In a blender, combine coconut milk, milk, eggs, coconut extract, vanilla extract, flour, sugar, baking powder and salt. Blend on low speed about 10 seconds until well blended. Pour mixture into a shallow bowl. Butter preheated griddle and dip bread slices into egg mixture and allow bread several seconds to absorb the mixture (I like to gently squeeze it like a sponge to make sure it gets soaked all the way through) then allow some of the excess to drip off. Cook on buttered griddle until golden on bottom, then lift bread with a spatula and butter griddle again. Then flip french toast to opposite side and cook opposite side until golden brown. Serve warm with coconut syrup and sprinkle with optional sweetened shredded coconut.
So I haven't tried this yet but I need to very soon, this french toast would be excellent if each slice were coated in a combination crushed cornflakes and ground sweetened shredded coconut (after you dip it in the egg mixture) and then cooked on a buttered griddle as directed. And to go one step further you could slice each piece of bread down the center stuff it with bananas with a little bit of brown sugar or crushed pineapple, diced mangoes or diced strawberries with sugar.
Coconut Syrup
Ingredients:
6 Tbsp butter
1 cup granulated sugar
3/4 cup canned coconut milk, well shaken
1 pinch salt
1/2 tsp baking soda
1/2 tsp coconut extract
Directions:
Melt butter in a medium saucepan. Stir in sugar, coconut milk and salt. Bring mixture just to a gentle boil over medium heat, stirring frequently. Remove from heat and stir in baking soda and coconut extract, whisk mixture for about 10 seconds until frothy. Serve warm. Store in refrigerator up to one week in an airtight container.
Recipe Source: Cooking Classy (adapted slightly from my Buttermilk French Toast and Vanilla Cream Syrup)
7 Temmuz 2012 Cumartesi
Sprinkles Red Velvet Cupcakes with Cream Cheese Frosting Copycat Recipe

If you've ever tried a Sprinkles Red Velvet Cupcake then I have the feeling you are really going to love this post. My family is obsessed with Sprinkles Cupcakes. Their Red Velvet Cupcake is simply irresistible. It is one cupcake that is truly hard to compete with, but I was definitely up for the challenge. On my recent vacation to Southern California I was sure to stop by Sprinkles in Newport Beach so I could refresh my memory on just exactly what that rich, sweet and even velvety cupcake tasted like so I could come home and create my own Sprinkles Red Velvet Cupcake Copycat recipe. I LOVE making copycat recipes at home. It gives me such a fun challenge in the kitchen. Everyone who tried these cupcakes said they tasted just like Sprinkles! If you don't believe them, try for yourself. These are without a doubt melt in your mouth amazing! Not low fat by any means but worth it, I loaded the butter in these babies (just like I assume Sprinkles does). Enjoy and share (if you wish =)!


Sprinkles Red Velvet Cupcakes
Yields 12 insanely delicious cupcakes
Ingredients:
1 1/3 cups all-purpose flour
3 Tbsp cocoa powder
1/2 tsp baking soda
3/4 cup salted butter, firm but not cold*
1 cup + 2 Tbsp granulated sugar
2 large eggs
1 Tbsp red food coloring
2 tsp vanilla extract
1/2 cup whole milk
1 tsp distilled white vinegar
1 recipe Cream Cheese Frosting, recipe follows
Directions:
Preheat oven to 350 degrees. In a mixing bowl, whisk together flour, cocoa powder and baking soda, set aside. In a separate large mixing bowl, using an electric mixer, whip together butter and sugar until pale and fluffy, about 4 -5 minutes. Add in eggs one at a time stirring after each addition. (Now stand back and change out of any nice shirt you have on and) Add red food coloring and vanilla extract and mix until combine. In a small mixing bowl (or in the measuring cup you used to measure milk), combine milk and 1 tsp vinegar. Add milk mixture and flour mixture to cupcake mixture, alternating in two separate batches, mixing until combine after each addition. Divide batter evenly among 12 paper lined muffin cups, filling each cup about 2/3 full. Bake in preheated oven 20-23 minutes until toothpick inserted into center of cupcake comes out clean. Remove from oven and allow to cool about 2 minutes in muffin tin, then transfer to wire rack to cool for 10 minutes, then transfer to an airtight container to cool completely (this just helps them retain more moisture). Once cooled completely, spread generously with Cream Cheese Frosting (just as sprinkles does, lots of frosting!).
*I warmed the butter in the microwave for about 9-10 seconds on HIGH power in a small microwave safe bowl, basically you don't want it softened but not cold either. Just in between the two. Also, alternately you could use unsalted butter and add 1/4 tsp salt to the recipe. I just always keep salted butter on hand so I wanted the recipe to use salted. So if you use salted you don't need to add any salt to the recipe.
Cream Cheese Frosting
Ingredients:
1/2 cup salted butter, firm but not cold (if using unsalted add 1/8 tsp salt)
6 oz cream cheese, cold (I recommend using Philadelphia brand in this recipe)
1/2 tsp vanilla extract
3 1/2 cups powdered sugar
Red and blue food coloring, for decor (optional)
Directions:
In a large mixing bowl, using and electric mixer, whip together butter and cream cheese until pale and fluffy (about 1 minute on high speed, then 3-4 minutes on medium high speed). Mix in vanilla extract. Add powdered sugar and beat until smooth. If doing optional infamous Sprinkles Cupcakes dot on top then scoop out a few tablespoons frosting into two separate bowls and tint with food coloring (lots of red in the one and barely any blue in the other). Spread a small circle of red on top followed by a small light blue, use a toothpick to spread if needed (it helped me get a more circular shape around the edges with its finer point).
Recipe Source: Cooking Classy
Rice Krispy Treats with Almond Butter and White Chocolate M&M’s

Dangerous. White chocolate M&M’s are dangerous! These M&M’s have been popping up all over the blog world lately since Easter is right around the corner and all the holiday candy is out. They are too good to be true and I had to pick up a bag. What also is too good to be true is I also been craving rice krispy treats. Random right? My best friend makes the best kind that are super gooey. I wanted to make my treats a little different. I figured peanut butter and chocolate is always my favorite combo. With the white chocolate, almond butter sounded like the right pair for these treats. I cut back on the butter and added more almond butter when I was melting the marshmallows. Mix in the white chocolate M&M’s and you have a perfectly delicious treat. Great for Easter or just because they sound so darn good right about now!

Rice Krispy Treats with Almond Butter and White Chocolate M&M’s
By Fallon
Ingredients:
2 tablespoons unsalted butter
1/4 cup creamy almond butter with sea salt
3 cups miniature marshmallows
3 cups crispy rice cereal
2-3 handfuls of white chocolate M&M’s
Directions:
Spray a 9 inch square glass baking pan with cooking spray, set aside.
In a large pot melt butter over low heat, stirring until butter is melted and brown. Stir in almond butter quickly, then add marshmallows stirring until melted and combined. Remove from heat and mix in crispy rice cereal until all combined and cereal is coated. Add a few handfuls of M&M’s and mix quickly to combine. Pour into a square baking pan and spread evenly. Cool completely and cut into 16 squares.


Even though you should let them cool completely, you should try them after about 10 minutes. The white chocolate M&M’s will melt in your mouth, since they are still a bit warm.

These are definitely going into work tomorrow!
Always,
Fallon